Now that Universal is gone for good, it’s time to focus on your GA4 data – is it as accurate as it can be?
Have you ever wondered how much traffic is coming from your employees? Is their constant interaction with your live website affecting your results?
In this guide we show you how to set up filters for internal IP addresses, how to test this traffic and then how to exclude them, making your data more accurate for decision making.
The use of a filter does come with a warning. Once you apply a data filter the effect on the data is permanent and you won’t be able to see it in Analytics. If you are not sure if you want to remove it completely, then it’s best to use report filters instead. You can create up to 10 data filters per property. A data filter for GA4 can take between 24-36 hours to apply and you will need to have an Editor Role at the property level to create, edit and delete data filters.
Step 1 – Identifying Internal Traffic
In GA4, click Admin > Data Streams > ‘X’ Data Stream > Configure tag settings > Show all > Define internal traffic > Create
Enter a name for the rule eg: Staff IP addresses
Enter a value for the traffic_type parameter. internal is the default value, but you can enter a value for say a specific location eg Head Office.
In IP addresses>match type – select an operator eg IP address equals.
In IP addresses>value – enter an address or range of addresses that identify traffic from the location you chose earlier.
Add condition to add multiple conditions. Any IP addresses that match the conditions will be marked as internal traffic.

Step 2 – Create a data filter
In GA4 click Admin > Data Settings > Data Filters
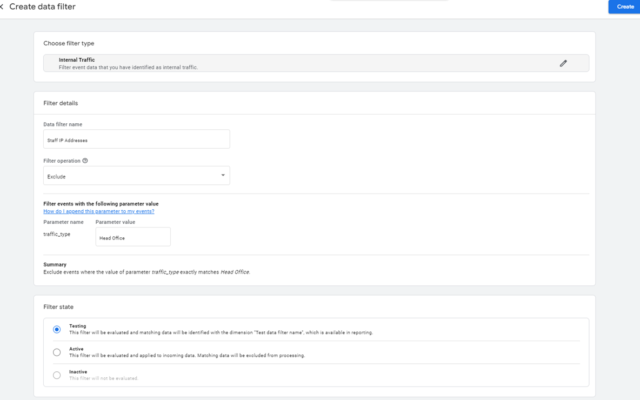
Click Create Filter > Internal Traffic
Enter a name for the data filter (the filter name must be unique)
Choose to exclude to filter our events where the value of the traffic_type matches the name you entered above, the default is internal (for our example we would use Head Office)
And choose from either Testing, Active or Inactive
Then click Create.
We find it’s better to test the filter to ensure that it is working as expected before setting it as active. You can leave the filter on testing permanently and then filter out traffic_type in your GA4 reports – it’s up to you!
Step 3 – Testing a data filter works
To make sure that the steps you followed above are working, head to the explore report section of GA4 and create a new ‘Free-form exploration’.
Add test data filter name and event name as a dimension, and event count as a metric
If you have multiple data filters you can choose to add a report filter
If you can’t see the information you are looking for – check back between 24-36 hours later.
Once you are happy with the filter – set it to Active to remove this data permanently from your GA4 account.
For more information – or if you would like to save some time and have our team do this for you – then get in touch at hello@polkadotdata.com